opencv移植到android免OpenCV Manager
2018年11月13日 2018年11月15日
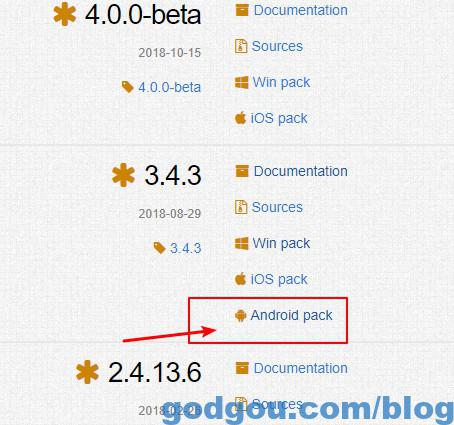
第一步:在官网下载opencv for android的sdk
官网:https://opencv.org/releases.html

第二步:将opencv导入安卓项目里面
Android Studio中创建一个Android项目,创建好之后,选择File->New->Import Module
然后 选择 opencv文件夹里面的SDK/JAVA
这样就导入进去了
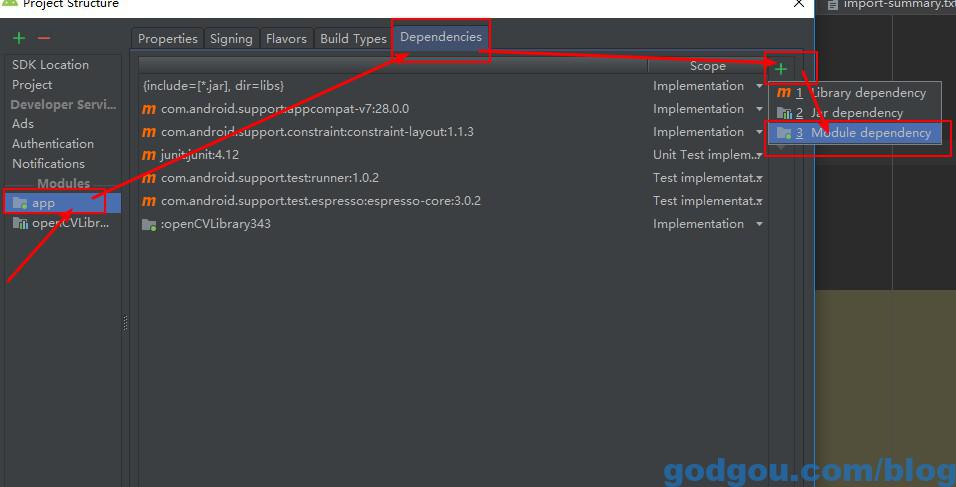
第三步:添加依赖
File/Project structure
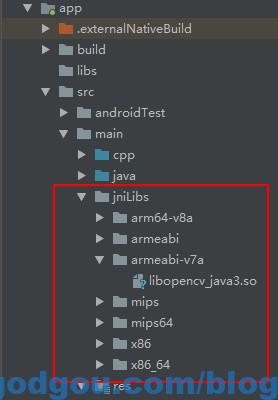
第四步:免OpenCV Manager
在自己app的文件夹里面app/src/mian下面创建一个jniLibs的文件夹
然后将下载下了的opencv库文件夹里面的opencv-android\OpenCV-android-sdk\sdk\native\libs
第五步:处理opencv库和安卓版本问题
打开OpenCVLibrary*的build.gradle将
|
1 2 3 4 |
compileSdkVersion * buildToolsVersion "*.*.*" minSdkVersion * targetSdkVersion * |
改成与app 的 build.gradle 的一致
第6步:打开app目录下的 CMakeLists.txt文件改成如下
|
1 2 3 4 5 6 7 8 9 10 11 12 13 14 15 16 17 18 19 20 21 22 23 24 25 26 27 28 29 30 31 32 33 34 35 36 37 38 39 40 41 42 43 44 45 46 47 48 49 50 51 52 53 |
# For more information about using CMake with Android Studio, read the # documentation: https://d.android.com/studio/projects/add-native-code.html # Sets the minimum version of CMake required to build the native library. cmake_minimum_required(VERSION 3.4.1) # set(CMAKE_VERBOSE_MAKEFILE on) set(libs "${CMAKE_SOURCE_DIR}/src/main/jniLibs") include_directories(${CMAKE_SOURCE_DIR}/src/main/cpp/include) add_library(libopencv_java3 SHARED IMPORTED ) set_target_properties(libopencv_java3 PROPERTIES IMPORTED_LOCATION "${libs}/${ANDROID_ABI}/libopencv_java3.so") set(CMAKE_CXX_FLAGS "${CMAKE_CXX_FLAGS} -std=gnu++11 -fexceptions -frtti") # # Creates and names a library, sets it as either STATIC # or SHARED, and provides the relative paths to its source code. # You can define multiple libraries, and CMake builds them for you. # Gradle automatically packages shared libraries with your APK. #set(CMAKE_LIBRARY_OUTPUT_DIRECTORY ${CMAKE_SOURCE_DIR}/src/main/jniLibs/${ANDROID_ABI}) add_library( # Sets the name of the library. native-lib # Sets the library as a shared library. SHARED # Provides a relative path to your source file(s). src/main/cpp/native-lib.cpp) # Searches for a specified prebuilt library and stores the path as a # variable. Because CMake includes system libraries in the search path by # default, you only need to specify the name of the public NDK library # you want to add. CMake verifies that the library exists before # completing its build. find_library( # Sets the name of the path variable. log-lib # Specifies the name of the NDK library that # you want CMake to locate. log) # Specifies libraries CMake should link to your target library. You # can link multiple libraries, such as libraries you define in this # build script, prebuilt third-party libraries, or system libraries. target_link_libraries( # Specifies the target library. native-lib libopencv_java3 # Links the target library to the log library # included in the NDK. ${log-lib}) |
第7步: 打开app目录下的 build.gradle 文件改成如下
|
1 2 3 4 5 6 7 8 9 10 11 12 13 14 15 16 17 18 19 20 21 22 23 24 25 |
android { defaultConfig { externalNativeBuild { cmake { arguments "-DANDROID_ARM_NEON=TRUE", "-DANDROID_TOOLCHAIN=clang","-DCMAKE_BUILD_TYPE=Release" //abiFilters "armeabi-v7a","arm64-v8a","x86","x86_64"//,"armeabi","mips","mips64" cppFlags "-std=c++11 -frtti -fexceptions" } } ndk{ abiFilters "armeabi-v7a","arm64-v8a","x86","x86_64"//,"armeabi","mips","mips64" } } externalNativeBuild { cmake { path "CMakeLists.txt" } } } dependencies { implementation project(':openCVLibrary343') } |
第8步:在调用opencv库的那个活动里面添加如下代码
|
1 2 3 4 5 6 7 8 |
public class MainActivity extends AppCompatActivity { // Used to load the 'native-lib' library on application startup. static { System.loadLibrary("opencv_java3"); System.loadLibrary("native-lib"); } } |